Sage advice – deploying machine learning models with Amazon SageMaker
By Michael Pearce on November 14, 2019Amazon SageMaker is a powerful managed service that enables data scientists and developers to build, train, and deploy machine learning workloads at scale, and there is a growing array of modules that make up the SageMaker platform.
As an AWS Machine Learning (ML) Competency partner, Peak doesn’t just build and deploy AI by hand – we script the infrastructure so that it is repeatable, autonomous and fits seamlessly into our enterprise AI System. The Peak AI System demonstrates a user-friendly way to deploy and host SageMaker API endpoints, while behind the scenes automating the authentication, packaging the model, and configuring the endpoint using key services such as API Gateway, Lambda, DynamoDB, Code build, Cloud Formation as well as Amazon’s SDKs.
What is SageMaker?
Amazon SageMaker enables you to build, train and deploy ML models on the AWS cloud. You can use its off-the-shelf algorithms or build your own, and it really does simplify and speed up the process of provisioning the infrastructure needed for ML. A few things help with this including the use of pre-baked images, off-the-shelf algorithms (or the simple process of selecting your own), and of course the fact you don’t need to provision, manage, or maintain the infrastructure the way you would with traditional EC2 instances.
SageMaker really is developing rapidly. When Peak first got started with SageMaker shortly after its release at AWS re:Invent 2017, there were merely five features. Now, just under two years later, there are 15 – and this number is continually growing. We’ve always been able to communicate honestly with AWS, giving valued feedback and advice as an ML Competency partner, and we’ve seen a wide range of feature requests and enhancement requests from ourselves and our customers fulfilled.
To help you understand the concept of deploying an ML model in the cloud, try thinking of the SageMaker endpoint you create as an API – you make a call to the endpoint, probably with a set of variable parameters, the model may make some calculations, then return a response in the form of a json payload. The response from the endpoint can then be integrated with other external systems to help you do great things with data.
Deploying with SageMaker
The development
Depending on where you are in your ML journey, or indeed your use case, you may choose to develop your own ML model rather than an off-the-shelf model. The next (also optional) step is to train the model. You can save any resulting model files to S3 for later user. You then need to write the inference code to build your API endpoint, that will serve the requests made to the model. This article won’t go into the details of building and API, but to make it scalable and production-ready I would personally recommend working on a robust template that you can re-use quickly to create new APIs later, and be ready to containerize it (you’ll need to build a Docker image and push it to ECR later on.)
To speed up future development, as well to make it consistent and repeatable, you may choose to create a ‘base’ Docker image with everything (but only what) you need for each project, and use that as the base for each new Dockerfile. Docker compose also comes in handy, especially for building and running locally to test before deploying.
Setting up the endpoint
When you’re ready to expose your model to the world, there will be three main steps to deploying your model with SageMaker: configuring the model, creating the endpoint configuration, and configuring the endpoint itself.
Create the model
As we configure the model in SageMaker, we provide the location of the model artefacts (where applicable – remember the output from the model training that we put in S3 earlier?) and then the location of the inference code (remember how we containerized this in a Docker image and pushed it to ECR?)
This might seem like a lot of work, a little laborious and likely to be error prone. So, in true DevOps style, let’s automate that!
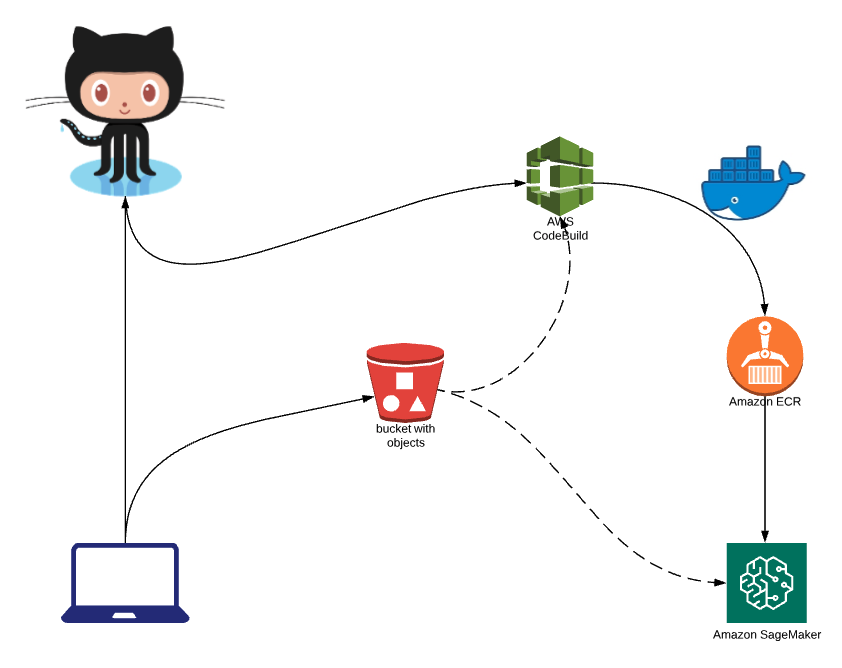
Here we see the developer writing their inference (API) code locally and pushing it to source control, in this case Github. They may also be generating model files and pushing them to S3 for storage and retrieval later.
The git commit triggers a CodeBuild project to start a job to package up the code as part of a Docker image. You could include the Dockerfile as part of the developer’s code repository, or fetch a standardized one from somewhere else.
Once that is successfully created, we push it to ECR.
The same CodeBuild project can even be used to make SageMaker SDK calls to configure the model in SageMaker, create the endpoint configuration and create the endpoint. You may also choose to specify where the model artefacts are located in S3 as part of the SageMaker configuration steps, instead of packaging them up in the Docker image.
Creating the endpoint configuration
This is where we start to do a bit more dynamic configuration – the production variants. This means firstly selecting the model that we just configured, you can even select multiple models as variants and apply weightings for A/B testing. Continue by selecting the instance type use, deciding how many instances to deploy, choose whether or not to enable elastic inference, and a few other small details. Let’s break those down a little…
Instance types
This is to the compute instance type to use, not dissimilar to launching a regular EC2 instance. Instance types are grouped into families based on core capabilities of the host computer hardware such as compute, memory, storage etc. Valid options can be found in the online documentation or the drop down list in the console. As of the current date, the available types include t2, m4, c4, c5, p2, and p3 instance classes each of varying capacity.
The p2 and p3 instances come under the Accelerated Computing family, launched with an attached GPU by default – useful for use cases such as deep learning.
Initial instance count
How many instances should you launch initially? Unfortunately, the default and minimum value is one, so you can’t terminate all the instances in the group to save on cost. Launching more instances would be useful if you have high volumes of traffic or the instances are generally getting well utilized.
Elastic inference
You may have some workloads that can benefit from the abilities of a GPU, but not require their use 24/7. Provisioning them anyway is financially inefficient, but luckily AWS introduced something called elastic inference (EI.) The EI provides acceleration when only required, and is automatically started when the supported frameworks are being used.
Latest supported frameworks can be found in the usual documentation but as of today some include EI-enabled versions of TensorFlow and MXNet. Although using a different deep learning framework, simply export your model by using ONNX, and then important your model into MXNet – use your model with EI as an MXNet model!
Configuring the endpoint
The last step in the process is to create an endpoint in SageMaker and apply the endpoint configuration you just created to it. You can reconfigure your endpoint later by creating new endpoint configuration and applying that to your endpoint instead.
Making it scale
SageMaker does do a lot of the heavy lifting for us already, but you may have noticed there are quite a few steps involved in the processes so far. To build a platform that enables users to autonomous and self-sufficient, we should probably abstract some of that away, so that they can focus on their domain knowledge (such as ML!)
Firstly, we noticed that most of the input values are fairly static or implied i.e. network configuration, encryption key, variables, tags etc. Other values may be provided by the user, but mapped to more understandable key/values…
- Instance type
- regular/medium/large/extra large
- Instance count
- expected traffic (low/medium/high)
- Elastic inference
- model type (regression/decision tree/KNN/deep learning)
- Autoscaling
- Set conditionally based on the instance types (T family instances aren’t compatible with SageMaker autoscaling)
But how do we achieve this?
Amazon’s Software Development Kit (SDK) is ideal for this! AWS provides an SDK for several languages such as javascript, go, python and more. We can use the SDK to help us automate the process as we saw earlier on in the article, and build that into a user-friendly interface.
Below is an early example of Peak’s AI System, demonstrating how easy it can be to deploy a machine learning model with SageMaker. As you can see the, the technical detail of the infrastructure etc. is abstracted away, so that the user can focus on their domain knowledge and quickly deploy a model. All they need to input is the locations of the inference code (API), model files (artefacts), instance count and type (size.)
Hosting the endpoint
When you configure a model in SageMaker, create an endpoint configuration and then apply that to an endpoint we have successfully started hosting our ML model on the cloud! Benefits of this include scalability, high throughput and high reliability, as well as being able to A/B test easily.
Architecture
We can build an interesting Infrastructure stack to abstract away the moving parts and make your project production ready.

So, our favorite AWS CTO & VP Verner Vogels is looking for t-shirt recommendations ahead of the next big conference, so he makes a call to our endpoint.
Thanks to the Route53 service we are able to provide a nice (short) user-friendly domain name, we can manage caching and distributed content delivery for high transfer speeds and low latency to the edge using CloudFront CDN. CloudFront also helps us protect our endpoint from Layer 7 attacks, and integrates seamlessly with AWS Shield for DDoS mitigation.
The call goes to API gateway and triggers a Lambda.
Lambda communicates with DynamoDB and KMS to check metadata and authentication before making the SDK call to SageMaker (notice the long convoluted endpoint that we are provided with.)
We use the Identity Access Management (IAM) service to configure the permissions via roles – this can allow use to do things like access specific buckets or objects in S3, communicate with different services, and so on.
Of course, as good practice we include CloudWatch alarms to monitor performance metrics and potential errors. We can also send logs to CloudWatch and/or the ElasticSearch service as appropriate.
SageMaker crunches the numbers, does the computation, outputs a recommendation etc. using the ML model we deployed earlier, and sends it back to Lambda, through API Gateway and back to the end user. This may seem like a lot of steps, but it can all happen in a matter of seconds!
TL;DR – Overview
SageMaker is…
- A managed service to build, train and deploy machine learning on AWS
- Moving fast!
We looked at…
- Packaging your ML model
- Setting up SageMaker endpoints autonomously
- A friendly user interface
- Hosting the models on the endpoints
- Making it production-ready
- Abstracting away the complicated moving parts

Decision Intelligence Report 2021